WIP
WIP is an acronym for the term "Work In Progress" and is used on /tg/ to refer to a thread General where posters are encouraged to share info on their current projects, or ask questions in hopes of getting advice. Said projects are often, but not always, related to Warhammer 40,000 and Warhammer Fantasy by virtue of popularity.
Modeling
Below is a short summary of advice usually given in WIP threads.
Purchasing
Models do NOT need to be first-hand. Bartertown and eBay are popular resources for obtaining secondhand miniatures. Remember to factor in shipping, as this may be what decides if and how much cheaper buying used is. It is important to remember that in Games Workshop stores, only models made by them may be used. A convenient loophole is Games Workshop does not care what the particular model is. A player wanting Zombies may want to get creative with Empire State Troops, or a player wanting Space Marines may decide to give Dwarfs Pauldrons. Even older lines, like Valley Of The Four Winds (which predated Warhammer) or pre-slotta models are viable. The only requirement in Warhammer Fantasy and Warhammer 40k is correct base size; in Age of Sigmar any base, even none at all, suffices.
Models which are being sold cheap due to a bad paintjob can be stripped back down to plastic via a day soak in Simple Green (for plastic or un-lacquered paint) or Dettol/Super Clean (for metal models, or paint that just won't come off) or similar products, and a scrub under warm water with a toothbrush.

Supplies
Generally speaking, a hobbyist interested in miniatures needs the following supplies: sprue cutters, a hobby knife, small paintbrushes, a mixing palette with wells, and paints including primer. Further supplies advanced hobbyists find useful are sandpaper and/or metal files, a supply of kneadite or greenstuff, a magnifying glass or a crocodile-clip magnifier, and podcasts or music to set the mood or entertain for the models being worked on.
Sprue cutters come in two variants; metal and plastic. Metal cutters have less precision but wear out much slower, and are designed for the extreme pressure needed to cut through both metal and thick pieces of resin. Plastic cutters are more precise, but may break or bend if trying to clip anything larger than a thing piece of a parts tree. Always orient the flat part of the blades of the sprue cutters towards the model, as cutting with the slanted side will leave remaining parts of the sprue and may damage part of the model.
It is important to remember that the company which produced the supplies does not matter; a hobby knife from Revell is the same as a hobby knife from Privateer Press as a hobby knife from The Army Painter or a hobby knife from Games Workshop. What DOES matter is that model paint stereotypically associated with Revell-style hard plastic models (enamel) is different from the paints usually used for softer plastic miniatures (acrylic). For more on this, see the Paint section.
Likewise, paint is virtually identical regardless of manufacturer. Some companies have tones that others don't have, but if you're mixing paint then Vallejo is Citadel is Reaper MSP is whatever else on the market. Some people have said they prefer the thickness of one company, some say the only difference is how long its been on the shelf, but the topic is not considered hot enough to be fairly called Skub. The only exception is the Citadel Technical Paints. Few other companies produce things like blood, rust, brush-on snow, or paints that dry and crack as they dry to produce an effect like mud or dirt, and no other company has the variety of effects. Even the most ardent opponent to buying from Games Workshop will grudgingly admit that Citadel Technical is a great range. Life Color and Vallejo also both produce environmental paints like mosses and lichen that Games Workshop does not offer however.
Container can also make a difference; some cheaper paints may come in containers which are of low quality and let in air despite the paint itself being the same. If you happen to use up paints which come in containers you like, consider saving some to transfer paint from bad containers to (or to mix up a large batch of a custom color you use in bulk). Many have complained of the degradation of quality in Citadel paint pots over the years.
Sprays also differ far more from company to company. Its important to remember that spray does not immediately mean primer. Primer coats the model in a base color, which will enhance following layers and make them stick to the model better. Spray gives you a basic color and goes on after the primer, representing either a basic color of the model you can work off of to save time or as a color to easily build up to the desired finished color from.
-
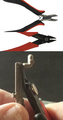 Metal sprue cutters (top), plastic sprue cutters (middle), and the way to cut from parts trees (bottom).
 -
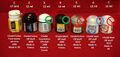 Citadel has gotten progressively worse over the years.
 -
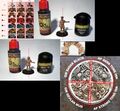
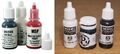 Reaper MSP and Vallejo paints.
 -
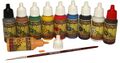 The Army Painter paints.
 -


Cleaning Models
While all models should be rinsed in water and allowed to dry after assembly and before painting, this step refers to removing the imperfections of a model caused by the casting process and the removal of the model from part trees. It is the first, and surprisingly often skipped even by "pro painters", step in finishing a model.
Mold lines and the remainder of sprues (or "parts trees"), called "flash" by some (although the term sometimes is used to refer to chunks of the parts tree), are to be removed via scraping with a hobby knife, sandpaper, or files. All three are viable and come down to preference. What your desired result should be is anything you do not want on the final model to not be present, as the Wash step makes these details very visible, ruining otherwise perfect paintjobs. When choosing metal files, be sure to pick one with a diagonal pattern over a dotted one. The latter can wear out fast. Due to the importance of removing flash, very few (if any) models should be painted on their sprues.
-
 Removal of mold lines and flash.
 -
 This is why you need to remove mold lines. Your model will NOT look good with this, no matter how good a painter you are.


Priming
Before any paint is applied, any hobbyist using acrylics should apply a layer of primer to their model (enamel can skip this step, see Painting below). Primer gives a base color which makes further layers more visible, and helps them stick to the model. Metal models should be washed with warm water and let dry prior to this step. Some models should be partially or fully assembled prior to priming (see Assembly below).
There are two methods to priming; spray-on, and brush-on. Neither is actually better than the other, and comes down solely to preference of the hobbyist although spray can save time on large models, and with lots of small models that can be done at the same time. The color of the primer does not matter either. If a model is predominantly a color, then using primer of that color can save time. Some hobbyists prefer to start with dark colors first, and paint lighter in layers and do any Wash steps last, and thus prefer black primer. Some do the opposite with the Wash after the priming and base colors, and use white or a light gray. When deciding, it comes down to your plan for painting your model (you do have one, right?).
Spray primer requires an area set aside for the spraying. Cardboard, not newspaper, should be placed well around the area to ensure you are not coloring the ground. Follow the directions on the can (usually to shake well, spray the cardboard until the color comes strong (this is not a waste, it is necessary), clean the nozzle, avoid open flame, not to hold the can between your legs and stab it with a knife on a drunken bet, and not to eat it.
Remember, LESS IS BEST and hold the can further rather than closer to achieve the best results. You can easily spray too much primer causing a blocky resulting look due to thick paint gluing the cracks that makes your model look horrible, requiring you to spend time soaking the model in Simple Green and scrubbing it with a toothbrush or putting the models up for sale for someone cheap to deal with. Do not touch the model to turn it over for spraying the other side(s) until it is fully dried or you may end up with a fingerprint for heraldry. Brush-on primer is much less complicated. Simply follow the instructions for painting below, and cover the whole model. The rule of not touching the painted portion still applies.
Assembly
The most straightforward part. Remove the flash, glue together as desired.
Glues have a lot of names and qualities, but for most wargamers there's only two important types, Cyano Acetate Cement and Polystyrene Cement.
- Cyano Acetate
A cement, most people are familiar with versions of this substance as "super glue" or "c/krazy glue". Somewhere on the bottle will be the words "cyanoacrylate". It will result in glued elements that you can still split if you use a bit of violence if you need to disassemble the model in the future.
Works well on both metal and hard plastics, as well as human skin and hair and...well, anything other than soft plastics. Having superglue debonder on hand is recommended as opposed to trying to tear something (like fingers) apart after a slight spill.
- "Ultra-thin" is the general version a modeler of Warhammer or similar games is familiar with. Comes in small squeeze tubes. Dries extremely fast, within single digit seconds to minutes. Usually these fuckers will dry out, requiring you to use a sewing needle to keep the opening working which results in pressure so your first attempt to glue again will splat a large drop on your model and fingers. To avoid this, tap the bottle while pointing the top upwards to clear the glue out of the applicator, make sure the seal around where the lid goes is clear of glue, place the lid on tightly, keep them upright when not in use, and consider putting them in the fridge to prolong their lifespan and slow the drying of glue stuck in the applicator.
- "Medium" is rarely seen, and comes similar to the Ultra-thin. This is the kind you'd get from a hardware store rather than a hobby shop. Usually comes in small metal tubes.
- "Thick" is generally called "Gap Filler" and is used at it sounds. It comes in a variety of bottles by company. There is a short window of time between applying it and when it hardens too much to file away and make surfaces flush, so this tends to be a substance only for experienced modelers. Various Activator products are sold that will harden it faster, while Hardeners are sold to make it bond stronger.
- Polystyrene Cement
Another cement. It will say "plastic solvent" or "Warning: solvent". This kind will melt plastics slightly, and is much more permanent. Should only be used for the harder plastics. Drying time varies by mixture. Precision is required for Polystyrene Cements since their nature to melt will result in ANY glue anywhere it shouldn't be leaving a nasty-looking mark that can be worse than any mold line.
- "Thick Tube" versions, which as you may have guess come in a tube like toothpaste, are popular with scale modelers, and are what most people think of with Revell model kits. Thick Tube is the most powerful, and takes hours to even days to dry and can damage a model very badly if it gets anywhere but where you are applying two pieces together.
- "Medium Viscous" come in bottles with extended applicators, and both dry faster and cause less damage if improperly handled. These are the most popular versions used today.
- "Ultra-thin/Liquid Poly" come like paste, sitting in a wide bottle with a brush attached to the lid to use to apply with. The brushes can be cut to be thinner for more precision. Cause the least amount of melting, and dry almost instantly. The version stereotypically associated with Tamiya models.
- Epoxy Resin
Consists of an adhesive and a hardener which are kept separate. Sometimes come in tubes, sometimes in a double syringe form. Must be mixed to be used. Basically like glue Green Stuff/Kneadite. Different mixes produce different drying times, and the longer it takes to dry the stronger the bond. Note that something has to be held in place from hours to days for this to set up, meaning models should be taped or clamped depending on the size of the model.
These are rarely used for tabletop game models, and are more for things that should be airtight like model ships with motors. Still, some models can get use out of it.
- Clear/Canopy Glue
A weaker bond than the cements, but designed to work like them. The cements give off fumes which can get you high give unwanted foggy effects to transparent glass elements like cockpit glass, so the Canopy Glues are a replacement that doesn't cause the same effect. Not very useful for anything else however.
- Gloss Varnish
Not really a glue, but it can be used as such. Used for holding softer parts to models, like small bits of cloth to Revell kits. Limited use for wargame modelers, who generally don't care if the pilot inside a cockpit looks like he's got real straps holding him into the seat.
- Clear Rubber/Silicone Cement
Domestic glues. Come in "All-purpose" and "Universal" varieties, with the former not being a solvent (read: won't melt parts of the model to make it stick). Their only real use is for softer plastics or things like cloth and rubber, meaning very little use for wargame modelers.
- White/Woodworkers Glue
That stuff you used to love peeling off things as a kid, that you used to make macaroni Valentines Day cards. Basically useless for modelers, although it can technically be used for scenery and basing.
- PVA Adhesive/Tacky Glue
The same as the White/Woodworking Glue, but a stronger bond. Basically the same thing, super watery and becomes rubbery when it dries. A decent choice for terrain and basing effects. Pros will mix it with various substances to make their own basing paints like mud or snow effects.
When gluing metal models, use the cement glue and a small single layer of tissue paper between the two metal surfaces. This will make the glue stick.
After assembly, use greenstuff or kneadite to fill in cracks and make the model look like it came in one piece. You should now be ready for priming (the reason you assemble and paint prior to priming is because you don't want a pattern to end between arm and shoulder or body and wing, and priming then assembling pieces that need crack filling require you to then prime again, resulting in a double-primed overlap at the edges).
Painting
The following assumes you will be using acrylic paints. Your main two options are acrylic and enamel, the benefits of enamel being crisp colors in one coat, no priming, doesn't chip easy, and no visible brushstrokes. But the downside is it forms a hard coat that is hard to strip, has fumes that get you high will make you sick if not properly ventilated, can really damage your brushes quickly if not cared for, requires chemicals to thin, and has a 24 hour-ish drying time. Enamels are stereotypically Testors brand paints in square bottom glass bottles that are used to paint Revell-style model kits of Sherman tanks and 1960's era cars. These are almost never used with miniatures for games not only for the aforementioned problems, but also because the market for colors and brand variety of acrylics is HUGE. They also can be cheaper. However, enamels are exceptionally good as a basecoat colour for their aforementioned benefits (hard finish, clean surface, can be applied VERY thinly without primer), especially on metal miniatures. A flat black enamel basecoat/primer applied with an airbrush will be superior in every way to even high-end acrylics applied from a spray can. Airbrushed acrylics are a happy middle ground, but still require several coats to form a solid enough layer that is resistant to rubbing.
In general, modelers and hobbyists have moved away from enamels and into acrylics. Enamel can be painted on acrylic, or acrylic onto a primer that was put on enamel if you want to mix mediums (the bright pop of some enamel colors can give a sort of "glow" to things like lights or buttons in vehicle cockpits for example). If applying acrylic paints over enamel without an interim primer, make sure the enamel has properly cured (this can take anywhere up to 48 hours). Do not mix the kind of acrylic paint used for canvas with model acrylics. It doesn't really work.
THIN YOUR PAINTS. No, seriously. It is not a meme. Neither is the wisdom of St. Duncan
See, paints will slowly begin to dry out and get thicker. This results in a chunky, extremely amateurish look that is akin to a crayon drawing of stick figures in the world of miniature painting. There's no set rule to how much to thin. Paint will dry at different speeds, and is obviously not all going to be made the same day. Generally, you do not want to thin in the paint pot itself unless you are trying to extend the life of your paint. Use your palette and put some paint in a well. Add a few drops of water and mix it, then brush the side of the well to observe consistency, which you want the same as milk.
Games Workshop has been known to arbitrarily change the names of their paints. If you use up a pot of paint and have difficulty finding a new one, google it to see if they have changed it recently.
Spray?
As previously mentioned, you will always want to begin with a primer. Consider a spray or ordinary brush painting the majority color of the model as your next step, which allows you to do models you'll be making many of MUCH faster. Spray Ultramarines a rich blue, spray High Elves blue or white, spray Daemonettes a shade of purple or lilac.
There is a downside to the spray effect however, and that is fine detail. Chainmail often has a second color beneath the silver, usually black, to give it dimension. Gauntlets and other segmented metals can look fantastic if a small amount of black exists between the joints. These effects can be accomplished in other ways, but are worth considering skipping a spray for.
-
 A guide by The Army Painter for how to use a spray to quickly finish a model.

Wash
Very few models don't need a coat of ink or wash (they're the same thing) to finish. Become familiar with your options for these, as you can greatly speed up your painting by picking a wash tone and color that allows you to apply basic colors, apply the wash, then only do a small amount of highlight and detail work to finish. For the record, a glaze and a wash are superficially the same thing. The technical difference is that a glaze consistently coats the model much more while a wash sinks into the cracks and stays light on raised parts; using the example of a Space Marine pauldron and the color green the glaze will turn the entire thing a decent green while the wash will turn it a light green and bring out the details. As a result glazing is technically part of the step of painting rather than the wash step.
A wash will highlight all the thin details of a model, like cracks in bone or veins in skin. Many modelers accomplish skin tone with a white primer or spray then follow it with a dark wash, saving a great deal of time and effort. Ghostly effects can be accomplished with blue on white spray, and flame effects can begin with red or orange on white. A wash can also give a degree of dimension to a model, as an alternative to the aforementioned "leave some black visible" in the Spray? section.
The Army Painter is the most popular manufacturer of inks and has a far greater variety then most companies, and makes a large can to just dip models in and give a and vigorous quick shake for fast washing of a large number of minis. Citadel and Reaper MSP also produce a large amount of inks and washes.
A lesser used but still entirely true /tg/ WIP meme is that the difference between a shit paint job and a decent one is the use of black wash (AKA Nuln Oil if using Citadel paints).
-
 The basics of what a wash can do.
 -
 The basic steps.
 -
 Washes vary more by shade and tone than by company.


Airbrushing
While it may initially seem that airbrushing is some super expensive thing for pro painters, it surprisingly is quite cheap compared to most things in wargaming.
A decent airbrush will set you back $40-100, and the various other supplies (discussed below) that you will need will cost you around another $40 or so. So...basically around the price of a Warhammer kit. In particular the Airbrush MAS KIT-VC16-B22 Portable Mini Airbrush Air Compressor Kit is a decent starter set for only $50 (do not use that airbrush holder on the compressor, it WILL just fall over).
Actual airbrush use depends on style. It can be easily used to prime models if loaded with a primer, and makes a good middle ground between spray can primer (which can get thick and have issues depending on your climate) and brush-on primer (which takes more time to do). You can also accomplish fantastic lighting effects, such as a light caused by gunfire or a light source (imagine a Space Marine illuminated by the blast from his gun, or an adventurer illuminated by his torch). Transition effects on larger models like dragons, phoenixes, or giant spiders can be done in a way that is arguably far better than could otherwise be done. On smaller models you can use an airbrush to turn your small paint pot color into a spray color, as discussed above, so you can then get into detail work. You can also use a blade to cut designs out of paper to use as a stencil, providing you some do-it-yourself decal work that can produce anything from flame paint on a vehicle to Ork checkerboard patterns to scales on a dragon.
Also, if you're fond of doing arts and crafts for the home you can use a modeling airbrush for just about anything small from holiday decorations (in particular Halloween headstones) to fingernails. Just as an added bonus.
The following is what you need to know for an airbrush:
- They come in Gravity Feed and Bottom Feed variants. Bottom feed requires its own specific bottles, which are premixed although by saving a bottle you can make your own mixes; this isn't really for tabletop miniatures, and is more something for professional or industrial work unless you intend to paint a LOT of things on a ridiculous scale in the same basic colors. You're almost certainly going to want gravity feed, which has a cup at the top where you can pour your paint which is just the same acrylic (it isn't recommended to airbrush with enamel unless you're willing to go through the extended effort in cleanup to ensure it doesn't get gummed up) paint that you use for everything else. Gravity feed works exactly how it sounds, the paint in the cup feeds into the airbrush and is blown out as you press the button. Luckily for you, gravity feed is cheaper!

- Airbrush sizes for tabletop miniatures range from 0.3mm for detail work to 0.5mm for...well, much less detailed work. Luckily this is the cheap end of airbrush sizes, anything larger would increase the price by a fair amount. So lucky for you!
- You will need a proper cleaning substance to run through the airbrush between paint sessions. While some people use simple dishsoap, the Airbrush Cleaner is cheap at $9 and you don't have to worry about longterm buildup or residue. Its strongly recommended that you buy a pot to spray into, which can double as a holder. The Airbrush Deluxe Airbrush 3 in 1 Cleaning Pot with Holder is another cheap option at $14, although the seller also offers a kit with cleaning tools; some people claim the tools are useful, others do not. Do some research to determine if you feel they are useful or not. You will want a station to actually spray your models, and at the highest price range you can buy a laboratory-style hood with a fan for $300...or you can just use a large cardboard box and a lamp. Since acrylic paint is not toxic you don't have to worry about fumes, so long as you aren't literally spraying towards your face. Likewise goggles are not really needed, unless you just feel like you want them. You will want to buy some gloves that offer dexterity, nitrile is recommended although if you have allergies, hate the texture, or want something more eco-friendly there's a world of alternatives.

- Once you get your airbrush, you need to get yourself into an area where you are unlikely to drop anything or have anything roll off and onto the floor, preferably using a large box of some kind, and learn about how your airbrush is put together. Look up the model on youtube for cleaning tutorials and reviews, study any instructions either included or on the website on how it is assembled. You're going to want to take it apart, VERY CAREFULLY and very slowly so you remember how everything went together, and put it back together while seeing how everything works. This is important because it will help you figure out how it is cleaned and will give you some working knowledge of how it operates. The most expensive part of most airbrushes is the inside needle, which is the part that not only can you quite easily stab yourself with (they are very sharp) but one drop and it will likely be destroyed; it is also most likely going to be the first piece to wear out and need to be replaced, although with good care their lifespan can last years and some people have managed to make due with their first for most of their modelling life. Much like a Marine knowing how to disassemble and clean their weapon (remember Forrest Gump?) you need familiarity in order to use the device properly.

- Remember to mount anything you want to airbrush on a wooden stick where it will later be glued (for example an arm should be attached at the shoulder where the blank spot will not be seen), use some kind of tweezers, or have other alternatives to simply touching the model with your hands at the ready. While you can technically airbrush while holding some larger things, it is extremely difficult to work on things like heads this way.

- Before the first time you want to airbush, make sure you have some practice. Set up your station. Use a plastic dropper to put some paint into your pot if its gravity feed, making sure to water it down with another dropper to THIN YOUR PAINT like you would otherwise. On a piece of paper or the surface of your workbench, practice what is called the "dagger technique" where you begin spraying far away, then bring the airbrush closer as you spray sidways creating a line that begins fat and ends sharp. Then do that in reverse, starting with a sharp line and ending in a fat one. Practice trying to shade an area in gradual intensity, experiment spraying from different angles, and do a few designs like writing your name or playing tic tac toe. Then take your cleaning pot and spray out all the leftover paint, fill with cleaning solution and spray that out, then use a soft cloth to clean out the leftover paint.

- Watch online guides and tutorial videos. There's a world of airbrushing techniques, but due to the nature of the way that the device works you want to know what you're doing before you try and do it unless you intend to experiment. If you discover something that there isn't a guide for, consider making your own to help out the modelling community.
Detail/Highlights
Varnish
Basing
The final step that is skipped by far too many people. Basing a miniature is visually putting them into their world, rather than as a piece on a game board.