Quest:Ruby Quest

Ruby Quest is a Choose Your Own Adventure game being run by the tripfag Weaver. What initially began as a confusing puzzle romp has swiftly become a decent unto madness not unlike the best Call of Cthulhu game you have ever been in, but twice as fucked up.
The archives of the game can be found here: http://suptg.thisisnotatrueending.com/archive.html?tags=Ruby
If you want to discuss the game with others, there is an IRC discussion available on the channel irc.rizon.net, room #RubyQuest.
Characters
WARNING: CONTAINS SPOILERS.

They may appear furry, but it is uncertain whether this is just so Weaver can differentiate them from each other quickly, or as a tip off to their Animal Crossing namesakes. Either way, some spoilers are below.
Contrary to what some people may say, no one's age has ever been mentioned ever.
Ruby
Ruby is the main character of Ruby Quest. Obviously. Her thoughts consist of the scrambled suggestions of the /tg/ community, and as such, she is both incredibly brilliant and surprisingly stupid. She is handling most of the monstrous happenings rather well, and has been declared a badass as a result. However, her psych is starting to be strained as the world around her gets stranger and stranger. Ruby is known for having a GIRLISH FIGURE, but is flat as a board.
Because she is effectively our character, Ruby has been described as the PC to Weaver's DM. This makes the game very engaging, and it has become quite popular as a result. The largest implication of this is that /tg/ is now a herbivorous bunny girl.
Ruby is actually quite a good fighter, and uses a Hook like no one's business. We no longer possess the hook, but wish we did. We feel safer when Ruby is a capable Hooker.
Tom
Tom is Ruby's only friend in this place. He is a gentleman, strong and silent, but more than willing to offer information and suggestions about things he knows. He was initially detached towards Ruby, but after the two have repeatedly saved each others' lives, it seems he has grown quite a liking towards her. Unfortunately, it seems Ruby doesn't feel NOW is the time to act on any romantic intentions...
He is well known for his MANLY PHYSIQUE, and is needed for most anything that requires strength to accomplish.
Red
Red is a creepy motherfucker. He carries a cane with him, and is not too fond of personal questions. He is convinced that he is not trapped like the others, and that he is where he is entirely by his own choice. He has a very morbid sense of humor.
Abominations Against All That Is Good
WARNING: CONTAINS SPOILERS.
They may all be called zombies, but all evidence points more towards shape shifters of some sort, rather than actual undead. The normal ways to kill things seem to work quite well.
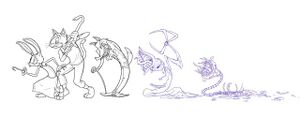
Bear Zombie
The Bear Zombie is a creature that was once a bear, and is now a pile of horrible organs and a spine. With the help of Tom, it was slain using the Z Hatch. The end boss of Part 1.
Hound Zombie
The Hound Zombie is also referred to as the Hook Zombie and the Plant Zombie, based on its form. This horrible creature came through a broken mirror, and was killed with the power of Ruby's mean right hook, the purple vat of acid, and an electrical panel. The end boss of Part 2.
God Zombie
The God Zombie has no discerning animal features, so it gets no animal name. Colloquially referred to as "Stitches," because he appears to have been torn apart and sewn back together. He was found nailed to a wall, and he was still alive and able to speak, in spite of his appearance. He also seems to have sent Ruby to a dream world, where impossible things happened that the world had never seen before.
Then, he vanished, and has not been seen again. However, it is common belief we have not seen the last of him. Found at the end of part 3.
Plot Summary
IT IS HIGHLY SUGGESTED YOU READ THE THREADS INSTEAD OF THE SUMMARIES. THEY CAN BE FOUND HERE: http://suptg.thisisnotatrueending.com/archive.html?tags=Ruby
Part 1
Consists of threads 1-4.
Ruby found herself locked inside of a steel locker. After escaping, we find herself in a room with very little in it. Ruby rips open a garbage can using a CAN OPENER, performs electrical repairs, and finds out we are underwater. Then, she heads down a ladder and meets Tom, trapped behind a wall grate.
Tom has a sculpture of random tools we need, but is unwilling to show us it, as we accidentally insult him. As an apology, we feed him fish [found to later be a Bad Idea]. After doing some weird puzzle shit, we open the way to the Z Hatch. We get a hatch to transfer items between Ruby and Tom, and with teamwork, we open up the closet in the Z Hatch Room. The Bear Zombie inside attacks us, and with Tom's help, we kill it.
A little more dinking around, and we finally free Tom from his cell. Ruby and Tom hug tightly, and Part 1 ends.
Part 2
Consists of threads 5-9.
With Tom's MANLY PHYSIQUE, we move a barrel and work together to open the way into the monitor room. Tom manages to sneak a peek at Ruby's panties while we are at it. We obtain the EYE DIAL, and then explore the Z Hatch room once more. With Tom's help, we find a secret door behind the couch. We send a hand we find there through the pneumatic chute we also find there.
We ask Tom for his condom, and he is disappointed to find we need it for more weird puzzle shit. Lots of experiments with purple acid later, we find out that Tom is not feeling so hot. He pukes up blood. Ruby quickly scrambles around, and eventually discovers, using an analyzer, than Tom had arsenic poisoning from the fish, and that we would get an antidote if we turned the power back on. While running around to find a way to get the power going, we do a Pirate Impression for Tom. He smiles weakly. All of /tg/ d'aaaws.
Eventually, we get the electricity and our antidote. Then we get locked in the back room, and poisonous gas filters in. Panicking, we break the glass of the pneumatic chute. This helps only slightly. We break the glass of the mirror in the room, and find the Hound Zombie on the other side. A brief scuffle with our HOOK, and we defeat the beast, power down the room, and flee with the antidote, running to where Tom is. Unfortunately, we find he is gone, and in his place is a LOT of blood...


